
Learn how to make a simple seedless blackberry jam recipe. You can use fresh or frozen fruit to make this low sugar blackberry jam with pectin.

Fresh blackberries are such a quintessential summertime snack. We’re lucky to have amazing Triple Crown blackberries growing in our backyard garden. Watching the big, beautiful berries change colors from green to red to black every year is so exciting! We eat them fresh in desserts, salads, and definitely by the handful.
This year we decided to save enough fruit to make blackberry jam or jelly. Now we get to enjoy that delicious summer flavor all year round.
Blackberry Jelly Ingredients:
Makes 4-5 cups of blackberry jam, or 4-5 half pint jars
NOTE: This recipe is Pomona’s Pectin low sugar blackberry jelly printed recipe, single batch with my notes included (NOT my original recipe). If using a different pectin, amounts may differ.
- 4 Cups blackberry juice (or at least 8-10 Cups of whole blackberries)
- 4 tsp pectin with 4 tsp calcium water
- 2 Cups sugar (Could substitute for 1 Cup honey)
- ¼ Cup Lemon juice
- 1 Tbsp White vinegar (Optional. For cleaning jar rims)
Tools Needed:
- 4-7 Clean half pint canning jars (Clean few extras just in case)
- 7 Canning lids with bands
- Large pot for cooking berries
- Water bath canner or large stockpot
- Canning tongs (optional)
- Canning funnel or wide mouth funnel
- Ladle
- 1-2 Fine mesh sieve (I used 2)
- 1-2 Large Heat resistant bowl (I used 2)
- Measuring Cups and spoons
- Flexible silicone spatula (optional)
- Paper towels (optional)
- Small plate placed in freezer (optional)

Seeds vs. no seeds in blackberry jam
First off, decide if you want to keep the seeds in your jam or remove them. I personally don’t love jams with the seeds included. Plus I wanted to give some away as Christmas gifts and knew that some of the recipients wouldn’t want them either. I’ll share how I got rid of the seeds while still getting the jam consistency in a bit.
If you don’t mind the seeds, you can just mash up your blackberries and use a classic blackberry jam recipe.
My goal was to make jam from whatever amount of fruit we had, so I measured out my fruit to know what I started with. This ended up being 23 cups of blackberries!
How I made low sugar seedless blackberry jam
After measuring out the berries, I put them in our medium sized stock pot to heat up at medium-low heat and added water. The water gives you a bit of liquid at the bottom of your pot to keep the fruit from sticking or burning. I started with 1 cup of water while constantly stirring.

Since there was a lot of frozen fruit, the water was freezing pretty quickly at first while the pot was heating up. Once I added two more cups, still storing to move the fruit around, I had enough liquid to keep things from burning.
When I had about 2 inches of juice consistently throughout the bottom, I covered the pot. I came back every 5 minutes or so to stir again until the fruit was fully thawed. This whole process took me about 20-30 minutes. You could definitely do this in less time depending on the amount of fruit you have and the heat you’re cooking with.

Since I planned to can my jam, I set up my water bath canner. I filled my large stockpot with enough water to cover my canning rack at the bottom and my half pint jars.
Next I placed my clean jars into the canner. Once they were all in, I added more water so that they were covered an additional inch from the top of the jars.
Then I set my stove to medium. The water takes a while to heat up. The goal here isn’t to have boiling water yet. I just wanted the jars to be hot by the time I was ready to put the really hot jam in them. Lessening the temperature difference between your jars and the product you put in them will prevent jars from breaking. So cold jars go in a cold canner, and warm jars go in a warm canner.
Once the fruit in my main pot thawed but was still cold, I brought the heat up to medium. Stirring occasionally, until I had a consistent simmer.
When the fruit was hot all the way through I removed it from the heat. Using a separate metal bowl with fine mesh sieve on top, I worked to separate out the juice from the seeds.
Seedless jam vs. jelly
Now, if you want to make jelly and not jam, it’s recommended to put the fruit in the sieve (potentially also lined with a cheesecloth) and let the juice naturally run out of it over the course of 2 or more hours.
If you push the juice through the sieve, you risk pushing some of the pulp through. This might make your jelly cloudy for lighter colored juices, or you end up with enough pulp to give your end product more of a jam consistency.
Since I happen to like jam (and I’m an impatient person), I took the risk of getting the juice through faster. This is how I ended up with a jam consistency.
Using a flexible silicone spatula, I scraped the fruit around the sieve until I got most of the juice out.

TIP: if you have a second sieve and a second bowl, you can then move the mostly juiced pulp to the side and let the remaining juice drip through naturally while you work on removing juice from another batch.
In the end I had 9 cups of juice. This was enough for a double batch of jam, plus one extra cup or juice.
Once you have your juice, you can now start making your jam or jelly!
Why I used a blackberry jelly recipe and pectin to make jam
The flesh of blackberries naturally have a certain amount of pectin in them. Since I had mostly juice with very little pulp, I decided to continue following the directions for blackberry jelly. I did this to make sure that my end product would fully set.
I’ve made jellies that didn’t set before. And while still delicious, it’s a bummer to get all the way to the end and not end up with the product I wanted.
To get the right amount of pectin, I recommend always following the instructions on your pectin package. I used Pomona’s Pectin which is a low sugar pectin. You could even substitute the sugar for honey!
I couldn’t find their blackberry jelly recipe on their website to link for you here, so I will include the instructions I followed from the Pomona’s package in my recipe below.
Making Blackberry Jelly with Pomona’s Pectin
The package instructions said that the recipe could be doubled or tripled, so that’s what I did. Some recipes will tell you not to increase batches, so I always follow their recommendation.
First, I made calcium water for the pectin. This was something new to me. Pomona’s Pectin comes with a calcium packet, which is required for their pectin to activate. Once that was done I set it aside.
Next, I measured out the sugar, pectin, and lemon juice I would need. I like to measure out all of my ingredients before I start so I can move quickly when cooking.
The 8 cups of juice went back on the stove to heat up. After adding calcium water and lemon juice, I let it come up to a boil.
While waiting, I mixed my pectin in with my sugar. Once the juice was boiling steadily, I added in the sugar and pectin mixture. I kept stirring as the sugar dissolved, the pectin activated, and the mix came back to a rolling boil I couldn’t stir down.
At this point I could feel the mixture thicken so I knew it was jamming up. I took a bit of the jam out with my ladle and put it on a cold plate to test it.
TIP: put a small plate in the freezer before starting your jam. When you want to test that it’s set correctly, take a small amount out of your pot and put it on the cold plate. Then run a finger through the drop of jam and turn the plate sideways. If the jam doesn’t drip or run, it’s ready.
Next I took the jam off the heat and got ready to fill my jars. If you can get another person to help you at this point, that’s great. The more quickly you can move the better. I asked my husband to help me out with this step.
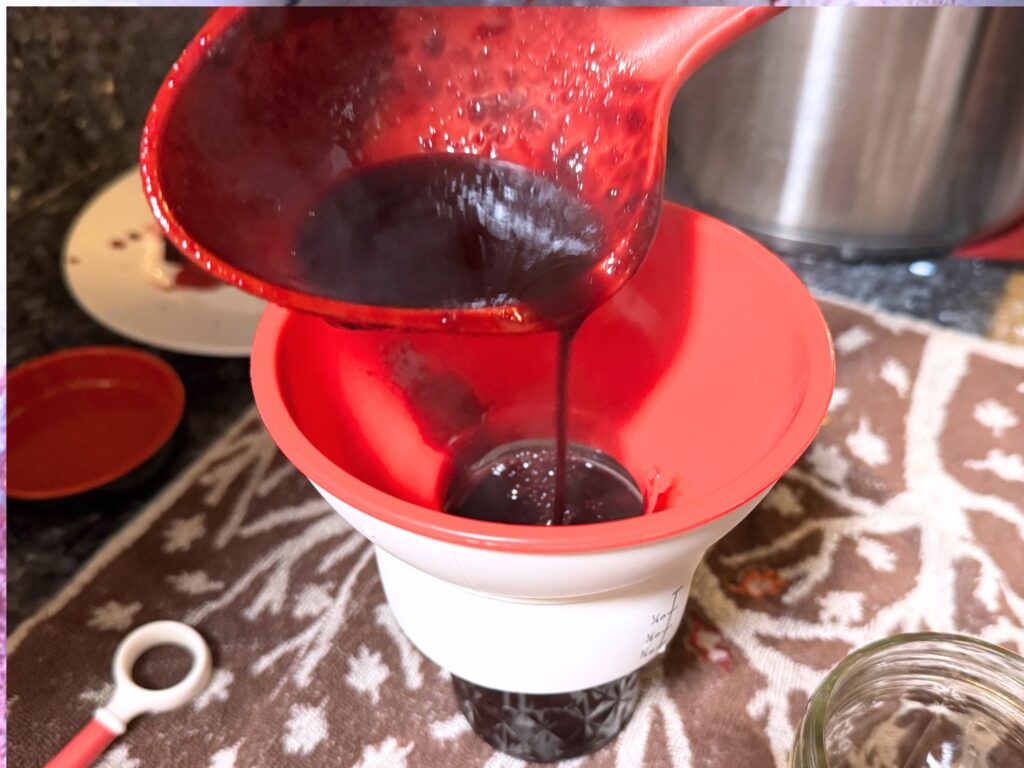
We took a couple jars out of the now hot canner. We dumped the hot water in the jar back in the canner and set it on the counter. Using a wide canning funnel, I ladled the jam into the jars as quickly as possible, making sure to keep ¼ inch headspace on each.
Next we ran a butter knife around in the jar to make sure there were no bubbles. Then we used a paper towel dipped in white vinegar to clean the rim of the jar. Once that was done, we put lids and bands onto the jar fingertip tight. The full jar then went into the canner. We repeated this process until the canner was full.


Then I put a lid on the canner and bumped the stove up to high. When the pot got up to a rolling boil I set a timer for 10 minutes of processing time.
While we waited for the first batch to come to a boil, we filled the second set of jars with jam. Because these jars weren’t hot like the first batch, I started by adding just a half an inch or so of jam into each one. This heated up the jar a bit while I filled them all. I repeated the process of leaving headspace, debubbling, wiping the rims, and adding lids with bands. Then we set them aside to wait for canning.
Usually we end up with a little jam leftover that isn’t enough to fill a jar. We actually love this! It means we get to enjoy some of the jam now. I made some biscuits the next day to go with the jam and we enjoyed them thoroughly.
Once the 10 minutes of boiling were up on the canner, I turned off the stove and left the jars in the pot for an additional 5 minutes. Finally I removed the jars carefully from the canner.
Then the canner was ready for the next batch of jam. Once all of the jars were done, I left them on the counter for 24 hours to make sure they were all fully sealed. Then I removed the bands for storage.

What’s the difference between blackberry jam, jelly, and preserves?
Jellies are made with the juice of the fruit you’re using. For this process all of the pulp and any seeds are removed. Jellies are known for their smooth, sometimes clear consistency.
Jams include some or all of the pulp or flesh of the fruit, crushed up into pieces. You get a bit of texture in your final product. It may also include seeds depending on your preference.
Preserves contain whole or largely cut pieces of fruit. It has the most chunky texture of the three options.
How to use blackberry jam
Blackberry jam is a fantastic ingredient that can be used in many ways including:
- On toast or biscuits: spread on top of warm bread
- In oatmeal: mix in blackberry jam with butter or milk to taste
- On poultry: dollop on top or on the side of finished chicken, duck, or other poultry
- In cake: add jam as a middle layer to tiered cakes
- On yogurt: swirl in for a light breakfast
- In ice cream: mix into ice cream base or top before serving
- On pancakes, waffles, or french toast: top as a syrup replacement (or combine the two!)

Do low sugar recipes need more fruit?
No, you do not need to add more fruit in order to make a low sugar seedless jam or jelly recipe. If using pectin, you do need to make sure the pectin you’re using is labeled as a low sugar pectin for the jam or jelly to set correctly.
How to freeze fruit to make blackberry jam or jelly later
Freeze fruit on a sheet pan first, then store in a freezer bag. This will keep the fruit from sticking together in a block. Flash freezing fruit in advance of more long term freezer storage will make it easier to measure out exactly what you need.
We do this with all of our frozen fruit now because it also makes it easier to add to smoothies, oatmeal, in baking, or any other day to day recipe.
Do you have to thaw the fruit before making blackberry jam or jelly?
For blackberry jam or jelly, you don’t have to thaw the fruit. Just add the frozen fruit straight into the pot. You will want to add 2-3 cups of water so that the bottom doesn’t scorch. Stir frequently until you have a good amount of liquid forming at the bottom of the pot.
Working with frozen fruit may increase your cooking time, but not by very much. Since I was working with about 23 cups of fruit, it took me about 30 minutes to completely thaw and heat the fruit.
How to safely thaw fruit for jam or jelly
If you do have fruit that you want to thaw, you can safely thaw it:
- In the refrigerator
- By quickly running warm water over it right before use
- By quickly heating it in the microwave right before use
Do not thaw fruit overnight on the counter. I read that it could grow harmful bacteria if thawed for that long in temperatures over 40 fahrenheit. I ruined an entire season’s worth of apricots this way. Learn from my mistakes!
Can you leave the seeds in blackberry jam?
Yes, you can leave the seeds in blackberry jam or remove them. It’s up to your preferred taste. Note that removing the seeds will also mean removing some of the fruit pulp, so your jam will likely need pectin to set.
Do blackberries have natural pectin?
Yes, blackberries do have natural pectin. This means that if you are making blackberry jam using all of the pulp and seeds, you don’t have to add pectin. However, blackberry jelly does require pectin.
Since I removed the seeds from this recipe and was working with the juice and only a little bit of pulp, I used a jelly recipe to make my jam.
Jams and jellies are simple and delicious
Have you ever made seedless blackberry jam before? What’s your favorite thing to eat it with? Hopefully we end up with a list of delicious options in the comments below.
And as always, if you end up giving this recipe a try, I’d love to know what you think!
Take care and happy growing!
Simple Seedless Blackberry Jam

Ingredients
- 4 Cups blackberry juice (or at least 8-10 Cups of whole blackberries)
- 4 tsp pectin with 4 tsp calcium water
- 2 Cups sugar (Could substitute for 1 Cup honey)
- ¼ Cup Lemon juice
- 1 Tbsp White vinegar (Optional. For cleaning jar rims)
- TOOLS:
- 4-7 Clean half pint canning jars (Clean few extras just in case)
- 7 Canning lids with bands
- Large pot for cooking berries
- Water bath canner or large stockpot
- Canning tongs (optional)
- Canning funnel or wide mouth funnel
- Ladle
- 1-2 Fine mesh sieve (I used 2)
- 1-2 Large Heat resistant bowl (I used 2)
- Measuring Cups and spoons
- Flexible silicone spatula (optional)
- Paper towels (optional)
- Small plate placed in freezer (optional)
Instructions
Prepare Jars and water bath canner (Optional)
- Wash all canning jars, lids, and rings.
- Place waterbath canner on the stove and add empty jars.
- Fill the canner with water until jars are covered by 1 inch of water.
- Cover the canner with lid and heat the stove to medium-low heat.
Prepare Fruit
- Pour frozen or fresh fruit into a large pot. If using frozen fruit, add 2-3 cups of water. Turn the stove to medium-low heat. Stir constantly until 2-3 inches of liquid covers the bottom of the pot to prevent scorching.
- Once liquid has formed at the bottom, cover the pot and check every 15-20 minutes until the berries are cooked down with a low simmer.
- Remove from heat.
Extract blackberry juice (with some pulp)
- Place fine mesh sieve over a large heat resistant bowl.
- Carefully ladle hot fruit mixture from pot into sieve.
- Gently scrape fruit inside a sieve with silicone spatula. Juice should be pouring from the bottom of the sieve into the bowl below.
- Once most of the juice is out, place pulp contents into a second sieve over a second bowl to continue to slowly drip (Optional).
- Set aside spent pulp and repeat until all juice has been processed out.
Make blackberry jam with Pomona’s Universal Pectin
- Make calcium water. Combine ½ cup water with ½ teaspoon calcium water in a jar with a lid. Shake well. Set aside for later use.
- Add measured blackberry juice and lemon juice to the original pot. Set the stove to medium high heat and bring mixture to a boil.
- Measure out just the amount of calcium water needed for the recipe (NOT the entire mixture you made) and add to the pot. Stir well.
- Measure sugar (or room temperature honey) in a separate bowl. Mix the amount of pectin needed for the recipe into sugar. Mix until thoroughly combined.
- Once fruit juice is boiling, add sugar and pectin mixture. Stir constantly to dissolve sugar and pectin while mixture returns to a full boil. 1-5 minutes. You should feel the mixture start to thicken after a few minutes.
- (Optional) Take a cold plate from the freezer to test the jam. Put a dollop of jam mixture on the plate. Run a finger through the middle of the mixture and turn the plate sideways. If the jam stays set, it's ready.
- Safely remove the pot from heat.
Waterbath can blackberry jam (optional)
- Set up a canning station on the counter. Spread out thick kitchen towels, clean funnel, canning tongs, ladle, white vinegar in a small saucer, paper towel, canning lids, and bands.
- Use tongs to carefully remove half of the warm/hot jars from water bath canner and place on towels.
- Place the funnel on top of a jar. Quickly and carefully ladle hot jam mixture into jar leaving ¼ inch headspace.
- Gently stir jam in the jar to remove bubbles.Move the funnel to an empty jar.
- Dip paper towel in vinegar and thoroughly clean rim of jar. Be sure to remove any jam and also feel for chips in the jar.
- Add lid and band to jar and tighten to fingertip tightness.
- Use tongs to add the filled jar back to the water bath canner.
- Repeat the process until all jars in the canner are filled.
- Place the lid on the canner. Turn to high heat.
- Once water is at a rolling boil, set a timer for 10 minutes. Continue boiling
- When 10 minute processing time is over, turn off heat. Leave jars in the canner for an additional 5-10 minutes.
- Remove jars from the canner and place on the counter for 24 hours. All lids should be securely sealed. Label as desired and store in a dark place.
Notes
This recipe is Pomona's Pectin low sugar blackberry jelly recipe, single batch with my notes included (NOT my original recipe). If using a different pectin, amounts may differ.
Can you guess what I’m craving right now? – https://rb.gy/es66fc?Juiffisa
Hi Amanda! It was definitely a hit with my family and friends. We’re going through it FAST! If you give it a try, let me know how it goes.